Deploy Your Application
Your code is ready and you want to see your app running in the cluster. This golden path takes you from a working application to a fully deployed, GitOps-managed workload on the Skyscrapers platform.
By the end of this path, your application will be:
- Containerized and stored in ECR
- Packaged as a Helm chart
- Deployed via FluxCD (GitOps, push to Git, Flux deploys)
- Built automatically by CI (GitHub Actions or GitLab CI) on every push
What Skyscrapers provides for you
Before you start, your Skyscrapers platform engineer will have provisioned:
- 1-n namespaces for your application on the cluster
- 1-n ServiceAccounts with IRSA (IAM Role for Service Account) giving your app the AWS permissions it needs
- 1-n ECR repositories for your container images
- 1-n Kubernetes secrets with infrastructure credentials (if applicable)
- Flux watching your repository via a GitRepository and Kustomization, this is what makes GitOps work
Technologies involved
| Technology | Role |
|---|---|
| Docker | Containerize your application |
| ECR | Store container images |
| Helm | Package your application for Kubernetes |
| FluxCD | Deploy from Git automatically |
| GitHub Actions or GitLab CI or any CI of your choice | Build images and package charts on push |
| Kustomize | Manage environment-specific overrides |
Repository structure
Your repository should follow this structure. A starter template is available at skyscrapers-golden-paths/deploy-your-application.
my-app/
├── app/                        # Your application code
│   ├── Dockerfile
│   └── ...
├── charts/my-app/              # Helm chart
│   ├── Chart.yaml
│   ├── values.yaml
│   └── templates/
│       ├── deployment.yaml
│       ├── service.yaml
│       └── _helpers.tpl
├── deploy/                     # Flux GitOps configuration
│   ├── base/
│   │   ├── kustomization.yaml
│   │   └── helmrelease.yaml
│   ├── common/
│   │   ├── kustomization.yaml
│   │   └── helmrepository.yaml
│   └── production/
│       ├── kustomization.yaml
│       ├── helmrelease-patch.yaml
│       └── secret.yaml          # SOPS-encrypted
├── .github/workflows/
│   └── build-and-push.yaml    # GitHub Actions
├── .gitlab-ci.yml              # GitLab CI alternative
└── .sops.yaml
Step 1: Containerize your application
Write a Dockerfile in app/. Follow these practices:
- Multi-stage builds to keep the final image small
- Run as non-root for security
- Explicit base image tags (not
latest) - Copy dependency files first to leverage Docker layer caching
FROM python:3.13-slim AS build

WORKDIR /app
COPY requirements.txt .
RUN pip install --no-cache-dir -r requirements.txt

FROM python:3.13-slim

RUN groupadd -r appuser && useradd -r -g appuser appuser

WORKDIR /app
COPY --from=build /usr/local/lib/python3.13/site-packages /usr/local/lib/python3.13/site-packages
COPY --from=build /usr/local/bin/gunicorn /usr/local/bin/gunicorn
COPY . .

USER appuser
EXPOSE 8080

CMD ["gunicorn", "--bind", "0.0.0.0:8080", "--workers", "2", "app:app"]
Note
This example uses Python/Flask, but the pattern applies to any language. Replace the build steps with your language’s equivalent (e.g. go build, npm run build, mvn package).
For the full Dockerfile conventions, see the Dockerfile best practices.
Step 2: Create a Helm chart
Your Helm chart lives in charts/my-app/. It defines how Kubernetes runs your application.
Chart.yaml
apiVersion: v2
name: my-app
description: A Helm chart for deploying my-app on Skyscrapers
type: application
version: 0.1.0
appVersion: "1.0.0"
Bump version whenever you change the chart (templates, values structure). Bump appVersion to track your application version.
values.yaml
replicaCount: 1

image:
  repository: ""
  tag: "latest"
  pullPolicy: IfNotPresent

service:
  type: ClusterIP
  port: 80
  targetPort: 8080

resources:
  requests:
    memory: "128Mi"
    cpu: "100m"
  limits:
    memory: "128Mi"

livenessProbe:
  httpGet:
    path: /health
    port: 8080
  initialDelaySeconds: 5
  periodSeconds: 10

readinessProbe:
  httpGet:
    path: /health
    port: 8080
  initialDelaySeconds: 5
  periodSeconds: 5

env: {}
Important
Resource limits: set memory limits, skip CPU limits. This is a Skyscrapers best practice. CPU limits cause unnecessary throttling. Set memory requests equal to memory limits to get a Guaranteed QoS class for memory while allowing CPU to burst. See Pods for the full rationale.
Health checks
Your application must expose a health endpoint. Kubernetes uses it to know when your app is ready to receive traffic and when it needs to be restarted.
- Liveness probe: “Is the process stuck?”, restarts the container if it fails
- Readiness probe: “Can it handle requests?”, removes the pod from service if it fails
At minimum, return HTTP 200 on a /health endpoint.
Connecting to infrastructure
If Skyscrapers has provisioned infrastructure for your application (RDS, ElastiCache, etc.), credentials and connection details are typically provided via a Kubernetes secret. Reference it in your deployment:
envFrom:
  - secretRef:
      name: my-app-infrastructure-config
Your Skyscrapers platform engineer will tell you the secret name and what keys it contains.
For the full Helm conventions, see Helm.
Step 3: Set up the Flux GitOps configuration
This is where the GitOps magic happens. You define what should be deployed in Git, and Flux makes it happen on the cluster, and continuously watches the resource.
How Flux connects to your repository
Before you write any Flux config, it helps to understand what’s already wired up on the platform side. Skyscrapers manages a platform repository per customer. Inside that repo, an apps.yaml file tells Flux to watch your application repository:
# Managed by Skyscrapers in the platform repo, you don't edit this
apiVersion: source.toolkit.fluxcd.io/v1
kind: GitRepository
metadata:
  name: helm-repository
  namespace: flux-apps
spec:
  interval: 1m0s
  ref:
    branch: main
  secretRef:
    name: repo-credentials  # Authentication to your Git provider
  url: https://github.com/your-org/your-app-helm.git
---
apiVersion: kustomize.toolkit.fluxcd.io/v1
kind: Kustomization
metadata:
  name: common
  namespace: flux-apps
spec:
  interval: 5m
  path: "./deploy/common"
  prune: true
  sourceRef:
    kind: GitRepository
    name: helm-repository
  decryption:
    provider: sops
    secretRef:
      name: sops-gpg
---
apiVersion: kustomize.toolkit.fluxcd.io/v1
kind: Kustomization
metadata:
  name: production-environment
  namespace: flux-apps
spec:
  interval: 5m
  path: "./deploy/production"
  prune: true
  sourceRef:
    kind: GitRepository
    name: helm-repository
  decryption:
    provider: sops
    secretRef:
      name: sops-gpg
This is what makes the whole system work:
- GitRepository points Flux at your repo’s
mainbranch, polling every minute for changes - Kustomization per environment tells Flux which path inside your repo to reconcile,
./deploy/commonfor shared resources,./deploy/productionfor production-specific config - SOPS decryption is configured so Flux can decrypt your encrypted secrets at deploy time
prune: truemeans Flux will remove resources from the cluster if you delete them from Git, Git is the source of truth
Warning
Be careful with prune: true. If you accidentally delete a manifest from your repo or move it to a different path, Flux will delete the corresponding resource from the cluster. This includes Secrets, PersistentVolumeClaims, and any other resource Flux manages. Always review your changes before pushing, especially when reorganizing your deploy/ directory structure.
When you add a new environment (e.g. deploy/staging/), your Skyscrapers platform engineer adds a new Kustomization entry pointing to that path. Everything else, the GitRepository, the SOPS config, the namespace, is already in place.
The diagram below shows how the pieces connect:
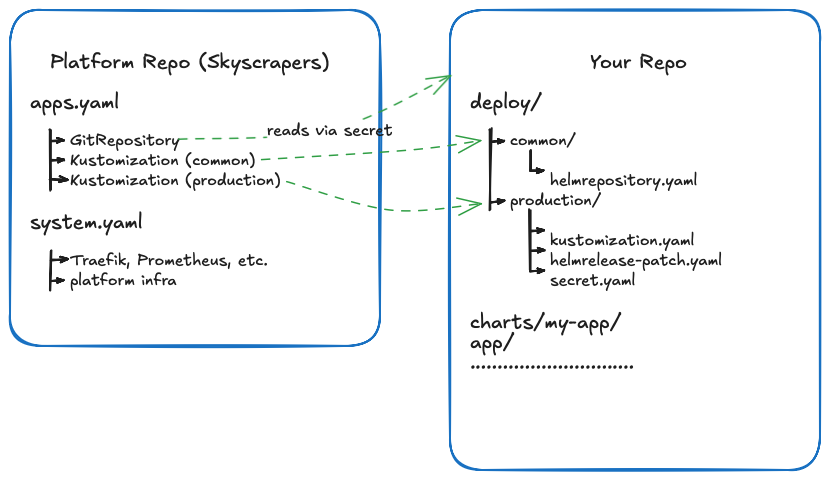
You own everything in your repo. You push changes to your repo, and Flux deploys them and keeps them in sync. You never need to touch the platform repo.
Base HelmRelease
deploy/base/helmrelease.yaml defines your application’s deployment as a Flux HelmRelease:
apiVersion: helm.toolkit.fluxcd.io/v2
kind: HelmRelease
metadata:
  name: my-app
  namespace: flux-apps
spec:
  interval: 5m
  chart:
    spec:
      chart: my-app
      version: "0.1.x"
      sourceRef:
        kind: HelmRepository
        name: my-app
        namespace: flux-apps
      interval: 1m
  values:
    image:
      repository: ""
      tag: "latest"
The version: "0.1.x" uses a semver range, Flux will automatically pick up patch releases of your chart.
HelmRepository (OCI)
deploy/common/helmrepository.yaml tells Flux where to find your Helm chart:
apiVersion: source.toolkit.fluxcd.io/v1
kind: HelmRepository
metadata:
  name: my-app
  namespace: flux-apps
spec:
  type: oci
  url: oci://123456789012.dkr.ecr.eu-west-1.amazonaws.com
  provider: aws
  interval: 5m
Replace 123456789012 with your shared tools AWS account ID. The provider: aws tells Flux to authenticate using the cluster’s IAM role, no static credentials needed.
Environment overrides
deploy/production/ patches the base with production-specific values.
deploy/production/kustomization.yaml:
apiVersion: kustomize.config.k8s.io/v1beta1
kind: Kustomization
resources:
  - ../base
  - secret.yaml
patches:
- path: helmrelease-patch.yamldeploy/production/helmrelease-patch.yaml:
apiVersion: helm.toolkit.fluxcd.io/v2
kind: HelmRelease
metadata:
  name: my-app
  namespace: flux-apps
spec:
  values:
    replicaCount: 2

    image:
      repository: 123456789012.dkr.ecr.eu-west-1.amazonaws.com/my-app
      tag: "1.0.0"

    resources:
      requests:
        memory: "256Mi"
        cpu: "200m"
      limits:
        memory: "256Mi"

    env:
      APP_ENV: production
This is where you set the actual image, replica count, resource sizing, and environment variables for production. The base stays generic; each environment patches what it needs.
For the full FluxCD documentation, see FluxCD.
Step 4: Set up CI
Choose the CI platform that matches your source control. Both options use runners and push artifacts to ECR.
Option A: GitHub Actions
.github/workflows/build-and-push.yaml builds your Docker image and packages your Helm chart on every push to main.
name: Build and Push

on:
  push:
    branches: [main]
    paths:
      - "app/**"
      - "charts/**"

env:
  AWS_REGION: eu-west-1
  ECR_REGISTRY: 123456789012.dkr.ecr.eu-west-1.amazonaws.com
  IMAGE_NAME: my-app
  CHART_NAME: my-app

jobs:
  build-image:
    runs-on: [self-hosted]
    permissions:
      id-token: write
      contents: read
    steps:
      - uses: actions/checkout@v4

      - name: Configure AWS credentials
        uses: aws-actions/configure-aws-credentials@v4
        with:
          role-to-assume: arn:aws:iam::123456789012:role/github-actions
          aws-region: ${{ env.AWS_REGION }}

      - name: Login to ECR
        uses: aws-actions/amazon-ecr-login@v2

      - name: Build and push image
        working-directory: app
        run: |
          IMAGE_TAG="$(date +%s)-${GITHUB_SHA::7}"
          docker build -t $ECR_REGISTRY/$IMAGE_NAME:$IMAGE_TAG .
          docker push $ECR_REGISTRY/$IMAGE_NAME:$IMAGE_TAG

  package-chart:
    runs-on: [self-hosted]
    permissions:
      id-token: write
      contents: read
    steps:
      - uses: actions/checkout@v4

      - name: Configure AWS credentials
        uses: aws-actions/configure-aws-credentials@v4
        with:
          role-to-assume: arn:aws:iam::123456789012:role/github-actions
          aws-region: ${{ env.AWS_REGION }}

      - name: Login to ECR for Helm
        run: |
          aws ecr get-login-password --region $AWS_REGION | \
            helm registry login --username AWS --password-stdin $ECR_REGISTRY

      - name: Package and push chart
        run: |
          helm package charts/$CHART_NAME
          CHART_VERSION=$(grep '^version:' charts/$CHART_NAME/Chart.yaml | awk '{print $2}')
          helm push $CHART_NAME-$CHART_VERSION.tgz oci://$ECR_REGISTRY
Key points:
- Self-hosted runners are optional. Since Flux handles deployment, your CI only needs to build and push, any runner that can authenticate to ECR works. Use
runs-on: [self-hosted]if you have ARC runners on the cluster, orruns-on: ubuntu-latestwith GitHub-hosted runners. - OIDC authentication (
id-token: write), no long-lived AWS credentials, the runner assumes an IAM role - Path filtering, only builds when
app/orcharts/change, not on deploy config changes - No kubectl, no cluster access, CI never touches Kubernetes. It builds artifacts; Flux deploys them.
Option B: GitLab CI
.gitlab-ci.yml achieves the same result for GitLab-hosted repositories:
image: alpine:latest

stages:
  - build-image
  - package-chart

variables:
  AWS_REGION: eu-west-1
  ECR_REGISTRY: 123456789012.dkr.ecr.eu-west-1.amazonaws.com
  IMAGE_NAME: my-app
  CHART_NAME: my-app

build-image:
  stage: build-image
  image:
    name: docker:27
    entrypoint: [""]
  tags:
    - sks
  services:
    - docker:27-dind
  rules:
    - if: $CI_COMMIT_BRANCH == "main"
      changes:
        - app/**
  before_script:
    - apk add --no-cache aws-cli
    - aws ecr get-login-password --region $AWS_REGION | docker login --username AWS --password-stdin $ECR_REGISTRY
  script:
    - IMAGE_TAG="$(date +%s)-${CI_COMMIT_SHORT_SHA}"
    - docker build -t $ECR_REGISTRY/$IMAGE_NAME:$IMAGE_TAG ./app/
    - docker push $ECR_REGISTRY/$IMAGE_NAME:$IMAGE_TAG

package-chart:
  stage: package-chart
  image:
    name: alpine/helm:3.17
    entrypoint: [""]
  tags:
    - sks
  rules:
    - if: $CI_COMMIT_BRANCH == "main"
      changes:
        - charts/my-app/Chart.yaml
  before_script:
    - apk add --no-cache aws-cli
    - aws ecr get-login-password --region $AWS_REGION | helm registry login --username AWS --password-stdin $ECR_REGISTRY
  script:
    - helm package ./charts/$CHART_NAME/
    - CHART_VERSION=$(helm show chart ./charts/$CHART_NAME/ | grep '^version:' | awk '{print $2}')
    - helm push "./$CHART_NAME-${CHART_VERSION}.tgz" oci://$ECR_REGISTRY
Key points:
- Self-hosted runners are optional. The
tags: [sks]uses Skyscrapers-provisioned runners on the cluster, but any GitLab runner that can authenticate to ECR works. CI only builds and pushes, Flux handles deployment. - AWS credentials are available to the runner via its IAM role (IRSA) or can be configured via CI/CD variables
- Rule filtering, only builds when relevant files change on
main
Step 5: Deploy
Once everything is in place:
- Push your code to
main - CI builds the image and pushes to ECR
- Update the image tag in
deploy/production/helmrelease-patch.yaml - Push the change, Flux picks it up within 5 minutes and deploys
Verify the deployment
# Check if Flux has reconciled your HelmRelease
kubectl get helmrelease -n flux-apps

# Check your pods are running
kubectl get pods -n flux-apps -l app.kubernetes.io/name=my-app

# Check the logs
kubectl logs -n flux-apps -l app.kubernetes.io/name=my-app

# Describe the pod if something is wrong
kubectl describe pod -n flux-apps -l app.kubernetes.io/name=my-app
If the HelmRelease shows a failure:
# Get the Flux events
kubectl describe helmrelease my-app -n flux-apps

# Check Flux logs directly
flux logs --kind=HelmRelease --name=my-app
For more Flux debugging, see FluxCD.
Adding environments
To add a staging environment:
- Copy
deploy/production/todeploy/staging/ - Adjust the values in
helmrelease-patch.yaml(fewer replicas, smaller resources, different image tag) - Encrypt environment-specific secrets in
deploy/staging/secret.yaml - Ask your Skyscrapers platform engineer to add a Flux Kustomization pointing to
./deploy/staging/in your cluster
The base HelmRelease stays the same, each environment only patches what differs.
Self-service environment management (advanced)
In the standard setup above, Skyscrapers manages one Flux Kustomization per environment in the platform repo. Adding a new environment means asking your platform engineer to create a new entry.
An alternative is to have Skyscrapers set up a single master Kustomization that points to a top-level path in your repo. You then manage your own Flux Kustomizations inside that path, giving you full control over environments without needing a PR on the platform side.
Platform repo (managed by Skyscrapers, one-time setup):
apiVersion: kustomize.toolkit.fluxcd.io/v1
kind: Kustomization
metadata:
  name: my-app
  namespace: flux-apps
spec:
  interval: 5m
  path: "./deploy"
  prune: true
  sourceRef:
    kind: GitRepository
    name: helm-repository
  decryption:
    provider: sops
    secretRef:
      name: sops-gpg
Note the path: "./deploy" pointing to the root of your deploy directory, not a specific environment.
Your repo — deploy/kustomization.yaml:
apiVersion: kustomize.config.k8s.io/v1beta1
kind: Kustomization
resources:
  - common
  - production
  - staging
Now you control which environments exist. Adding a new environment is just creating a new directory and adding it to this file. No platform repo changes needed.
Note
Discuss this option with your Skyscrapers platform engineer. The standard per-environment setup gives Skyscrapers more visibility into what’s being deployed and where. The self-service approach gives you more autonomy but means you’re responsible for managing the Kustomization structure correctly, including the prune: true implications.
Automate image tag updates
Once you’re comfortable with the manual flow, you can automate the “update image tag” step using Flux image automation. This removes step 3 from the deploy flow, Flux detects new images in ECR and updates the tag in Git automatically.
Tag format
Flux needs to sort your image tags to figure out which one is newest. A commit SHA alone (a3f2c1d) isn’t sortable, SHAs are essentially random. The simplest fix is to prefix the tag with a Unix timestamp:
<unix-timestamp>-<short-sha> # e.g. 1735689600-a3f2c1dThe timestamp gives Flux monotonic ordering; the SHA keeps the tag traceable back to a commit. If you followed the CI snippets in Step 4, your images are already tagged this way.
Note
You might be tempted to use SemVer (1.0.0, 1.0.1, …) instead. It works, but only if your CI always produces strictly increasing versions. With continuous builds and out-of-order merges, timestamps are more reliable.
ImageRepository
Tells Flux to scan your ECR repository for new tags. Place this in deploy/common/:
apiVersion: image.toolkit.fluxcd.io/v1beta2
kind: ImageRepository
metadata:
  name: my-app
  namespace: flux-apps
spec:
  image: 123456789012.dkr.ecr.eu-west-1.amazonaws.com/my-app
  interval: 5m
  provider: aws
provider: aws authenticates via the cluster’s IAM role, no static credentials needed.
ImagePolicy
Selects the newest image by timestamp. Place this in deploy/common/:
apiVersion: image.toolkit.fluxcd.io/v1beta2
kind: ImagePolicy
metadata:
  name: my-app
  namespace: flux-apps
spec:
  imageRepositoryRef:
    name: my-app
  filterTags:
    pattern: '^(?P<ts>[0-9]+)-[a-f0-9]+$'
    extract: '$ts'
  policy:
    numerical:
      order: asc
The pattern matches <timestamp>-<sha>, extracts the timestamp, and picks the highest value. Any tag that doesn’t match (e.g. latest) is ignored.
ImageUpdateAutomation
Tells Flux to commit tag updates back to your repository. Place this in deploy/common/:
apiVersion: image.toolkit.fluxcd.io/v1beta2
kind: ImageUpdateAutomation
metadata:
  name: my-app
  namespace: flux-apps
spec:
  interval: 5m
  sourceRef:
    kind: GitRepository
    name: helm-repository
  git:
    commit:
      author:
        name: fluxcdbot
        email: fluxcdbot@users.noreply.github.com
      messageTemplate: "chore: update image to {{range .Updated.Images}}{{println .}}{{end}}"
    push:
      branch: main
  update:
    path: ./deploy
    strategy: Setters
Marker comment
Add a marker comment in deploy/production/helmrelease-patch.yaml so Flux knows which field to update:
spec:
  values:
    image:
      repository: 123456789012.dkr.ecr.eu-west-1.amazonaws.com/my-app
      tag: "1735689600-a3f2c1d" # {"$imagepolicy": "flux-apps:my-app:tag"}
From now on, every image your CI pushes to ECR will be picked up by Flux within ~5 minutes and the tag in Git will be updated automatically. Flux reconciles the HelmRelease on the next pass and the new image rolls out.
Verifying it works
# Check what tag Flux currently considers "latest"
kubectl get imagepolicy my-app -n flux-apps -o jsonpath='{.status.latestImage}'

# See the last scan results
flux get image repository my-app -n flux-apps

# Confirm the automation is running
flux get image update my-app -n flux-apps
Avoiding the commit loop
Flux commits image updates back to the same repo your CI watches. Without guardrails, those commits re-trigger CI, which builds another image, which Flux commits again. Break the loop by keeping the paths filter in Step 4 tight:
on:
  push:
    branches: [main]
    paths:
      - "app/**"
      - "charts/**"
      # deliberately NOT including deploy/**
The CI in Step 4 already does this. Just make sure you don’t widen the filter later.